UV DTF workflow for fast, durable prints in production
The UV DTF workflow is redefining how brands decorate apparel and products, delivering vibrant visuals with fast turnarounds, robust wash resistance, and durable performance across multiple runs and fabrics. By integrating UV DTF printing with a robust transfer process, you gain high image quality, rapid curing, predictable color behavior, scalable asset libraries, repeatable ICC profiles, and a production-ready DTF workflow that scales from hobby projects to high-volume production. UV curing for DTF ensures inks set quickly, stay vivid, and bond solidly to fabrics, producing durable DTF prints that resist cracking, fading, and wear in real-world use—supporting both light-duty runs and extended campaigns. A well-structured transfer pipeline supports a reliable DTF transfer workflow, minimizing setup time, reducing misregistrations, and delivering consistent results across batches and substrate types, with seamless integration into your curing, finishing, and QA processes. This guide walks you through the core concepts, compatible materials, and practical steps to build a repeatable, scalable process you can rely on day after day, with checklists to simplify training and QA.
Put simply, this topic can be framed as a direct-to-film UV transfer process, where UV-curable inks sit on a transfer film before being applied to fabrics. Other LSIs include terms like direct-to-film UV printing, film-to-fabric transfers, and a color-managed curing sequence that all describe the same production pathway. The aim is consistent, production-scale results—vibrant colors, strong adhesion, and wash-fast durability—whether you call it a UV-based film transfer or a DTF printing workflow. By adopting these allied terms, you can better plan equipment, choose compatible materials, and optimize curing and finishing steps for reliable outputs.
UV DTF workflow: Fast, production-ready results for apparel and products
A UV DTF workflow merges high image quality with rapid cure times to deliver production-ready results for apparel and small- to mid-sized product runs. In the world of UV DTF printing, the combination of UV-curable inks on transfer film yields vivid colors, sharp details, and bond strength that stands up to washing and abrasion. When you frame your process around a UV DTF workflow, you’re prioritizing speed without sacrificing durability, making it suitable for everything from hobbyist projects to small- to medium-scale production lines.
To achieve these gains, align the core elements: a capable printer that handles UV inks with repeatable precision, a UV curing station that cures inks quickly and evenly, a robust RIP for color management and tiling, appropriate transfer films, adhesives, and a heat press or calendar for final transfer. By pairing reliable hardware with an optimized workflow, you reduce misprints, shorten setup times, and increase overall throughput while maintaining durable DTF prints across batches.
DTF transfer workflow essentials for a dependable, scalable system
A solid DTF transfer workflow starts with a clear plan that links file preparation, color management, substrate handling, curing, and finishing. By focusing on the DTF transfer workflow as a single, repeatable process, you can minimize bottlenecks and variability, which is essential for scalable production. This planning phase should also define acceptable tolerances for registration, color fidelity, and adhesion across fabrics.
In practice, the essentials include standardized file templates, consistent substrate prep, precise film alignment, and well-tuned curing and pressing steps. These elements create a predictable path from design to final product, ensuring each run meets the same quality bar and contributing to a truly production-ready operation.
Color management and RIP strategies for durable DTF prints
Color management is the backbone of durable DTF prints. A reliable RIP, calibrated color profiles, and accurate ICC targets help you reproduce vibrant hues, skin tones, and saturated colors on a range of fabrics. By prioritizing color stability and repeatability, you minimize color drift between batches and reduce the need for reprints. This focus on precise color control directly supports the durability of the final print, since consistent ink laydown reduces weak spots that could wear unevenly.
Practical RIP strategies include creating templates for common substrates, leveraging tiling patterns that reduce ink wastage, and implementing automated print queues that minimize head cleaning interruptions. With standardized color workflows, you can push through more jobs faster while still delivering durable DTF prints that hold up under real-world use.
UV curing for DTF: optimizing cure quality and adhesion
UV curing for DTF is a decisive step that locks in color, adhesion, and washfastness. A well-chosen cure unit delivers uniform radiant energy across the entire printed area, preventing hotspots, tackiness, or undercured zones that could compromise durability. Proper curing also helps the adhesive bond to the substrate more reliably, which is critical for soft textiles as well as hard surfaces.
To maximize results, monitor curing times relative to ink chemistry, substrate type, and film choice. Consistent curing avoids delamination and color cracking while maintaining sharp edges and solid color density. Establishing standardized cure protocols across job types ensures durable results and reduces post-processing variability.
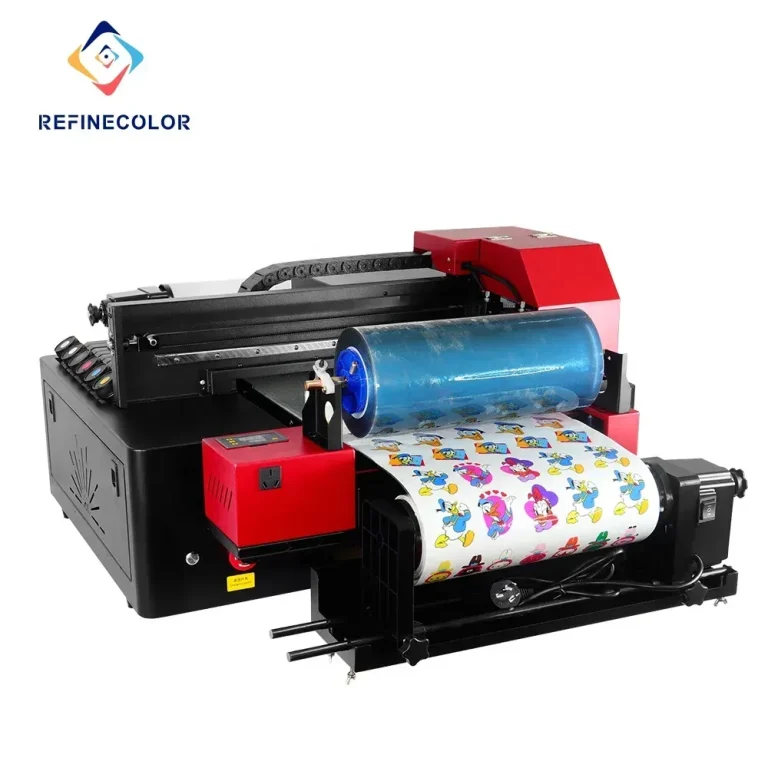
Materials and equipment for durable UV DTF production
Choosing the right materials is essential for durability and color accuracy. Look for UV DTF printing inks formulated for UV-curable systems, compatible transfer films, and adhesives designed to bond well to cotton, polyester, and blends. The right powders, if used, also play a critical role in reducing tack and improving wash resistance. Textiles selection matters too; understanding substrate composition and how it responds to UV inks helps you predict adhesion and longevity.
Beyond inks and films, the workflow benefits from reliable RIP software, heat press or calendar equipment with precise temperature and pressure control, and a curing station that ensures consistent results across large runs. With a carefully chosen material set and compatible process tools, you’re laying the groundwork for a truly production-ready DTF workflow.
QA, maintenance, and continuous improvement of the UV DTF workflow
Quality assurance should be woven into every stage, from prepress checks and color verification to wear-testing and final inspection. Simple QA checks—visual consistency, color stability, and adhesion tests on representative fabrics—help identify drift early. Maintaining a log of calibration results, defects, and throughput provides the data needed for informed tweaks to the UV DTF printing process.
Ongoing maintenance and optimization are part of a healthy production system. Regular nozzle checks, cleaning cycles, and calibration updates keep the workflow reliable. By tracking metrics like defect rate, batch size, and time per print, you can drive continuous improvements that sustain fast speeds, durable outputs, and predictable performance over time.
Frequently Asked Questions
What is a UV DTF workflow and why it matters for durable prints?
A UV DTF workflow is the end-to-end process for applying UV-curable DTF inks to transfer films and then onto textiles, using UV curing for DTF to lock color quickly. It matters because it yields vivid color, sharp detail, and strong adhesion, delivering durable prints that withstand washing and wear. A well-structured UV DTF workflow reduces setup time and batch-to-batch variation, making production-ready results achievable for both hobby projects and shops.
Which hardware and materials are essential for a production-ready UV DTF workflow?
Key components include a UV DTF-compatible printer, a UV curing station, a robust RIP for color management and tiling, transfer films and textiles compatible with UV inks, adhesives and powders, and a heat press or calendar for final transfer. Together these tools support a production-ready DTF workflow by delivering fast curing, consistent color, and durable adhesion.
How does UV curing for DTF affect durability and print quality?
UV curing for DTF provides instant or near-instant cure, resulting in strong adhesion and resistance to washing, cracking, and fading. A properly tuned curing step ensures even energy across the print, reducing issues like edge glow or ink cracking, which supports durable DTF prints in real-world use.
How can I optimize color management in a UV DTF workflow for consistent results?
Develop standard color profiles in your RIP for common fabrics, run calibration targets, and use consistent tiling and job templates. Regular calibration minimizes drift and helps maintain production-ready results across batches.
What are common UV DTF printing challenges and how can I troubleshoot them?
Common issues include color shifts between batches, adhesion problems, ghosting or head clogs, and misregistration. Troubleshoot by re-profiling, checking substrate compatibility and adhesive, ensuring proper curing, and performing regular maintenance and nozzle checks.
What is a step-by-step path to a repeatable UV DTF workflow from prepress to finishing?
Start by defining production goals and mapping the workflow; calibrate printer and color tools; optimize RIP and print queue; prepare the substrate and film; execute the print with balanced speed and detail; cure decisively with even energy; apply post-processing if needed and perform QA; maintain the system with ongoing checks to sustain a production-ready DTF workflow.
| Topic | Key Points |
|---|---|
| What is UV DTF workflow and why it matters | – UV DTF uses UV-curable inks on a digital transfer film designed for direct transfer to textiles or other substrates. – Cures rapidly with a UV curing unit, delivering vivid color, sharp details, and a robust bond to fabric. – Typically more durable and resistant to cracking or fading than some traditional inkjet methods, especially on performance textiles and hard surfaces. – A well-structured UV DTF workflow reduces setup time, minimizes misprints, and improves consistency across batches. – Manufacturers and shop owners pursue a streamlined workflow that emphasizes speed without sacrificing durability. |
| Building blocks of a strong UV DTF workflow | – Hardware: a printer that handles UV DTF inks with repeatable accuracy. – UV curing or drying station to cure quickly and evenly. – Robust RIP software for color management, tiling, and print order optimization. – Transfer films and textiles compatible with UV inks and the chosen adhesive system. – Heat press or calendar for transferring the design with controlled temperature and pressure. – Align these elements to minimize bottlenecks and improve production efficiency. |
| Materials and equipment for a production-ready UV DTF workflow | – UV DTF inks: select UV-curable inks designed for DTF films with good color gamut, adhesion, and compatibility with textile substrates. – Transfer films: films optimized for UV inks and adhesive systems. – Adhesives and powders: adhesives bond well to film and substrate; powders reduce tack and improve wash resistance. – Textiles: know base materials (cotton, polyester, blends). Durability depends on substrate compatibility as well as ink adhesion. – Curing and finishing: a reliable UV curing system ensures instant or near-instant cure, followed by finishing steps (if required) to protect the print. – RIP software and color management: a good RIP allows precise color profiles, tiling, and print order optimization so you can push through jobs faster, increasing production efficiency. |
| Setting up the UV DTF workflow: step-by-step | – Define goals and map workflow: target speeds, run lengths, durability; map sequence from file prep to finished product; include prepress checks, printer warm-up, ink calibration, curing, and post-processing. – Calibrate printer and color workflow: baseline color profiles, test patches, standard color target; verify color stability; regular calibration. – Optimize RIP and print queue: standardized job templates with fixed color profiles, resolution, and tiling patterns; batch jobs by substrate and ink load. – Prepare substrate and film: textiles clean, pretreated if required; align film precisely; consistent feed path reduces skew. – Execute print with speed and quality: choose resolution balancing speed and detail; ensure critical areas are fully inked to avoid washed-out colors. – Cure decisively: ensure adequate radiant energy across the area and avoid overheating; consistent cure per print. – Post-processing and finishing: lamination or topcoat if needed; ensure powders are fully cured and removed before inspection. – Quality assurance and testing: simple checks: visual, color consistency, small wear test; keep sample runs. – Maintenance and ongoing optimization: nozzle checks, cleaning cycles, calibration; track metrics to identify improvements. |
| Strategies to maximize speed and durability in your UV DTF workflow | – Optimize substrate handling: use jigs and alignment aids to speed up setup and reduce errors. – Standardize color profiles: maintain a library of profiles for common fabrics and finalize with tweaks rather than re-starting from scratch. – Batch processing: group jobs by substrate and ink load to minimize the time spent on file preparation and color correction between jobs. – Monitor curing quality: invest in a reliable cure station and periodic QA tests to ensure each print meets durability standards. – Invest in maintenance: regular printhead cleaning, lint-free conveyors, and routine calibration prevent slowdowns caused by avoidable issues. |
| Durability and performance: balancing speed with longevity | – The core promise of the UV DTF workflow is fast production without sacrificing durability. To achieve this balance, prioritize adhesion, cure consistency, and proper substrate preparation. Textiles with strong fiber bonding respond better to UV-curable inks, while white or light-colored fabrics can reveal color shifts if profiles aren’t accurate. Don’t be afraid to run extended durability tests on representative products; the investment pays off when returns are measured in longer product lifecycles and fewer reprints. |
| Common challenges and troubleshooting | – Color shift between batches: Revisit color management, re-profile the printer, and verify substrate compatibility. – Peel or poor adhesion: Check adhesive compatibility, ensure the substrate is clean, and confirm your curing parameters provide complete cure. – Printhead clogging or ghosting: Regular maintenance is essential; dedicate time to align and clean nozzles and verify media transport. – Delamination on textured fabrics: Consider alternative adhesives or surface pre-treatments and confirm curing coverage. |
| Maintenance, QA, and continuous improvement | – A production-ready UV DTF workflow isn’t a one-time setup. It requires ongoing QA, data-driven tweaks, and a culture of continuous improvement. Document your calibration results, keep a log of throughput and defect rates, and schedule regular maintenance checks. Over time, refinements in ink formulations, transfer films, or curing sequences can yield noticeable gains in both speed and durability. |
Summary
UV DTF workflow enables fast, durable prints across apparel and products while maintaining image quality. By combining reliable hardware, compatible materials, precise color management, and a disciplined curing process, you can scale from hobby projects to production runs without sacrificing print integrity. This approach emphasizes repeatability, QA, and continuous improvement to minimize misprints and downtime, delivering vibrant, long-lasting results customers expect. In a UV DTF workflow, consistency in adhesion, curing, and finishing translates into vibrant, long-lasting finishes across diverse fabrics and surfaces, supporting a production-ready approach that meets customer expectations and drives efficient operations.